Saturday, March 28, 2015

No Sweat Printmaking Stations

Can we all agree that printmaking can be messy! Ugh! But the results can be just as wonderful! Wow! 

It's even more wonderful to find a way to make printmaking work in your art class with the least amount of mess. 

Well, I had some teachers ask me how I set up my printing stations that I wrote about in my Japanese Art/Culture post.  

So here it is. If you'd like to see how you can set up a printmaking stations with the least amount of mess, read on!


A  week or  two  before you have  a  printmaking lesson coming  up, you can always  check  to  see  if any  of  the Teacher  Assistants  are available  during that  class time.  Sometimes  you can get lucky and have an extra set of  hands  helping you out. 

This particular time  I  wasn't so lucky, no  TA was available to help me. But I did have an intern  with me this Spring, so he was available to help out. 

While I was working  with kids, at the two printing stations, my intern was working with the other kids in the class on a drawing project.


The Set Up


The table is covered with a  layer of  large style newspapers to keep it clean. But on top of that paper, on my left side;  is a stack of  small tabloid style newspapers. In my case, The New York Post works well. If you don't have any small tabloid style newspapers in your area, you could cut regular size newspaper in half. The fish is put on top of the stack of small newspaper, when the student is ready to ink it.  

I sit on this side of table, the student is sitting where the blue seat is.

To my right of the stack of paper, is the  printing plate, where the roller is loaded up with ink.


The fish is loaded up with ink, on the stack of small newspaper, using the roller. As the fish is being inked,  usually the small newspapers also get covered  with ink. But the  first layer of large newspaper that was put down, isn't touched and it's still keeping the table clean. 


The two print stations


After the print is made, the fish is moved over. Take the ink covered small newspaper and throw it into the waste basket, that you can have placed next to you. The next paper in stack of small newspaper is clean and now ready for a new print to be made  with the next student.


Having the stack of small newspaper under the fish helps you to keep things moving. And it really helps to make clean up go smoothly. By the time everyone is done printing all the dirty, inked papers have already been put in the garbage. You can just throw out the first layer of large newspaper that have been covering the table. All that is left it to clean up the fish and the ink trays.

Would my printmaking stations work for you? What would you differently? You can make a comment below.


Sunday, March 22, 2015

The Single- Point Rubric


Hey, if you're anything like me you're always trying new things. Thinking there's a better way. Well, I've been thinking about my grading rubric a lot lately. 


Travelling between two schools, rushing around a lot trying to get prepared for lessons and spending a lot of time on grading.

That's my life! Probably yours too!

So I've been looking for a way to grade better and more efficient. Then I came came across a single point rubric and decided to give it a try.

Here's the low down on the single point rubric. 


The center column lists the Standards. I have five. Two are always the same- Work Habits and Craftsmanship. Three are empty, so I can fill them in to reflect  objectives from each individual lesson. There's also a little box that you can checked off for each Standard that's been reached. 

The right column is for you to make a comment on Standards that have been exceeded. And in the left column there is a space for you to comment on what the concerns are for the work.

I'll be trying this out to see how it goes. I can always reboot if need be.

How about you? Do you want to try out this rubric too? You can check it out and print my pdf here.


Tuesday, March 17, 2015

Pop Art Sneakers


If you want a good way to introduce your students to Pop Art, this is a a good lesson. And, you also get a second bonus. It integrates phys ed vocabulary with art. Yea, for that!

The kids first need to  figure out what kind of sneaker they want to draw. It could be any brand (Reebok, Nike or Adidas, etc.) or a combination of two brands.

Next, they have to think of what sport activity is important to them. It could be football, soccer, dance etc. After figuring out their sport, they need to think of two action verbs that are reflected in the sport. The laces will spell out the action verbs in cursive. (Teacher alert- the cursive is usually the hardest part for the kids.)


After the kids have drawn out their sneaker, you can then introduce them to Pop Art. I usually show them the work of Andy Warhol and Roy Lichtenstein. This helps the kids get the idea of working with the primary colors and thick, black line. Some of the kids also like to add the Ben day dots, which I don't require in this project. They also can add two additional secondary colors to the sneakers. But the primary colors are a requirement.

I have the kids use water color pencils for this project. The samples that I've shown are not fully completed. They've been (almost all) colored in with the water color pencil, but the water hasn't been add on top yet.


Below are a couple of the sneakers that are finished. The water has been added over the water color pencils.


What do you think of these Pop Art Sneakers? Would this work in your art class? 
You can comment below.

Friday, March 13, 2015

More Japanese Art and Culture

Here is the next part of my Japanese art/culture unit. The kids get to learn about the Japanese tea ceremony and calligraphy.


The Way Of Tea


Tea ceremonies is Japan can last up to six hours long. So my tea ceremony is a kid friendly version that is a lot shorter in time.

When I start  the tea ceremony, five students are chosen to participate- 1 hostess and four tea drinkers.


Before the 'ceremony' starts the kids all have to wash their hands to purify themselves. They then bow silently to the hostess.

As the kids enter into the 'tea room' they stop and admire a  piece of art work. They each have to give some kind of words of admiration about the beauty of the art work to the tea hostess.

Above you can see the kids starting of eating a sweet treat or higashi. Japanese tea is extremely bitter. Keeping a harmonious balance is important to the Japanese. So the ceremony is started with a sweet treat to balance out the bitter tea. They always have to bow and thank the hostess for the treat.


The kids are served the tea in order, by the oldest to the youngest. The tea cup is held in the left hand and the tea is poured. Then the right hand turns the cup three times to the left. The kids then drink the tea. And the cup is turned back three times to the right. The purpose of turning the cup is for every one to admire the beauty of the ceramic cups.

Calligraphy (Shodo) The Way of Writing

Calligraphy is a traditional part of Japanese culture. Elementary students in Japan learn the basics of calligraphy in penmanship classes.

For the calligraphy part of the unit  I show them examples of Japanese Kanji; which are an adaption of Chinese characters. 

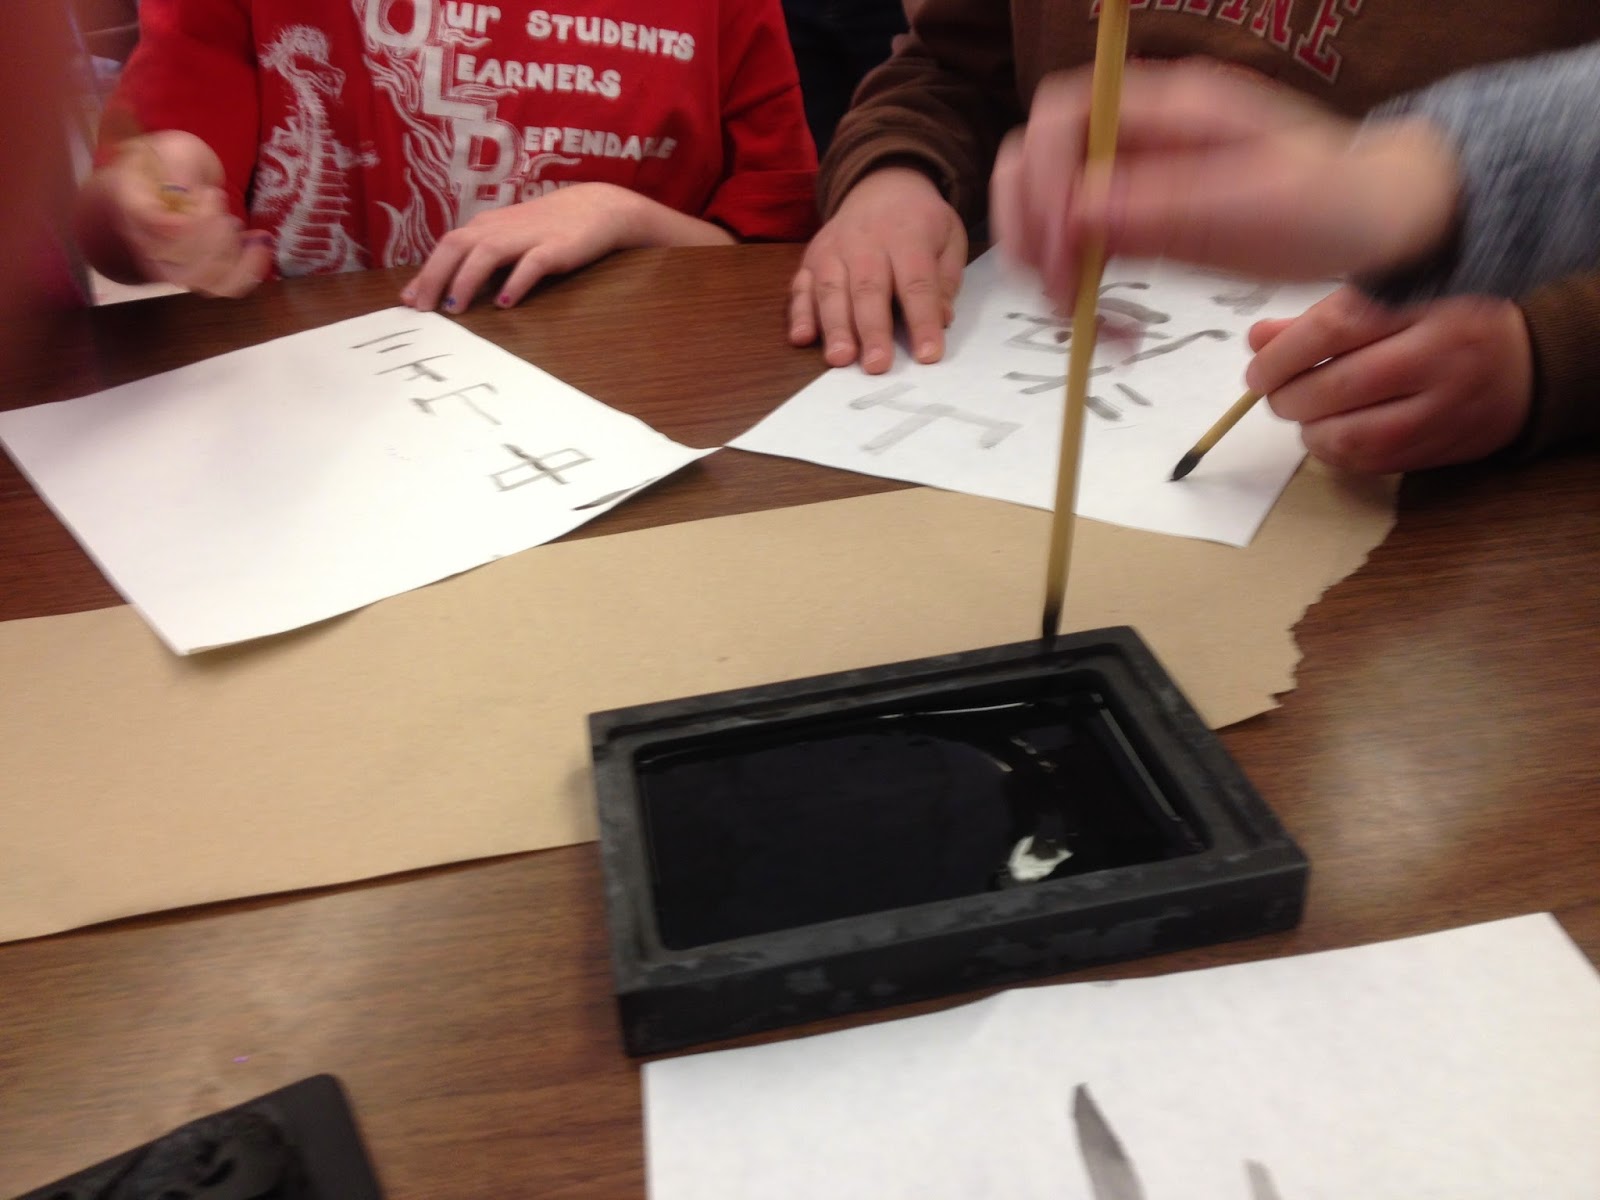
First, they kids get to make the ink. They do this by using an ink stick, which is ground into ink stone with water. 


They then get to try make different Kanji characters using different sized calligraphy brushes. They press hard with the brushes to make thick lines and press softly to make thinner lines. They are also reminded to hold the brushes straight up and down, not at an angle. There is also a metal bar called a bunchin that can be used to weigh down their papers while they are writing.


The Logistics


The whole unit lasted about 7 weeks, as we meet once a week for 45 minutes. The printmaking took the most amount of time, about 3 weeks. I also had my intern with me, which helped with the  printing process, as I only had two print stations.

If you want to see more of my Japanese art unit, you can check it out here.

I can't end this post without  a big 'thank you' to the Japan Fulbright Memorial Fund. One of the highlights of my teaching career!


I'd like to hear what you think about this Japanese art/culture unit. You can comment below.


Sunday, March 8, 2015

Japanese Art and Culture Unit

I was fortunate enough to spend about a month touring Japanese public elementary and secondary schools as a Fulbright Memorial Fund Scholar a few years back. It was such a wonderful experience, that I always like to add Japanese art to my curriculum. What I do, is actually, teach a whole unit combining the culture and art of Japan. 


So here's my first post,  which show  the run down on the first half of this year's 4th grade Japan unit.

We start off  learning about the kimono. 


One student is chosen to wear it and  the pieces  are put on her in front of the class. I don't have all the pieces of a kimono, but I have enough. As the pieces are put on, I talk about the history of the kimono and what the purpose of the different parts of it are. For example, the skinny red tie on top of the obi is a symbol that the wearer is unmarried. Or the sandals above are worn informally in the summer months.


After the kimono is demonstrated, we move on to the use of chop sticks. The kids are shown an expensively carved set of chopsticks along with a variety of chopstick holders. The kids get to use the chopstick holders, but they use a more inexpensive bamboo chopstick when its time for them to eat. I chose about four or five students to try them out after I demo their proper use. The food I let them try to eat are mini marshmallows.


Next the kids learn about the Japanese Fish Market in Tokyo and the history of fish prints. We then make our own fish prints using the Gyotaku fish print sets and black ink.


Our fish prints are then cut out and glued onto a white paper  that had been colored in with multi-colored pastels. Then we cut out ocean themed silhouettes  in black paper for all the details, such as sand, rock and seaweed etc, to finish off the art work.


In an upcoming post I will write about the rest of the Japanese unit- the tea ceremony and calligraphy.

I'd love to hear your thoughts about this art unit. You can comment below.


Ps. Hey, do you want to see another Japanese inspired art lesson?  Japanese artist Hokusai's wood block print The Great Wave off Kanagawa is the inspiration for this post. Check it out here. Or here's more on my Japaneses unit here.